Friday, May 18, 2018

Disinfect Huge Amounts Of Water With Bleach


Avoid any bleach products with added fragrance, dyes or cleaning properties. You need regular, unscented bleach for disinfection. Filter the water to be disinfected using whatever you have to hand – coffee filters are great, but you can use clean cloths, towels, two clean socks stuffed inside each other or cotton fabric plugged into the neck of a funnel. Whatever you’ve got, basically.
You need to be sure that you’re adding the right amount of bleach for the quantity of water being treated. Regular household bleach should contain a concentration of around 5.00-8.25 percent sodium hypochlorite. That’s what we’re working with here, so check the label to make sure that your bleach doesn’t differ wildly from that strength.

You’ll need:

  • Regular, unscented bleach at room temperature
  • Clean medicine dropper

Method:

1. Filter your water (especially if it’s cloudy) using the most efficient method available to remove particles and sediment.
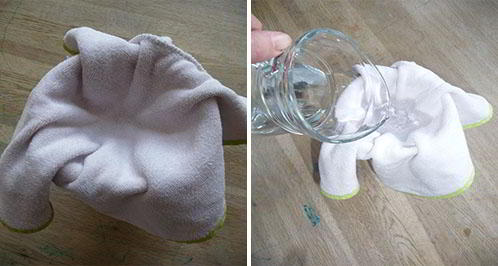
2. Assuming your bleach is regular household strength of 5 – 8.25 percent sodium hypochlorite, add 2 drops of bleach for every liter/quart of water (or 8 drops per gallon). The easiest way to do this is to pour a little bleach into the cap and draw up a small amount in the dropper.Step 2 How to Disinfect Water with Bleach and How to Store It
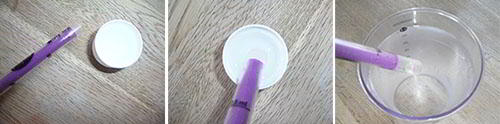
3. If your water remains cloudy after filtering or has a colored tinge, increase the dose of bleach to 4 drops per liter.Step 3 How to Disinfect Water with Bleach and How to Store It
4. Stir the water well and leave it to stand for 30 minutes before pouring into a clean container and capping. If your container has a screw top, then take a moment to wipe or splash the threads with the purified water. This reduces the risk of any dirty liquid or particles hidden in the threads contaminating the disinfected water.
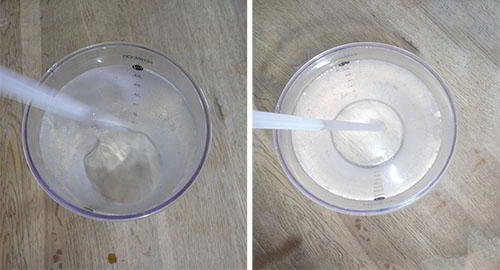
Step 4 How to Disinfect Water with Bleach and How to Store It

Shelf Life

Water treated in this way has a shelf life of 6 months when stored in a cool, dark and dry place.
An excellent skill to get to grips with for any situation where regular water services are interrupted or unavailable, this simple method of making water safe to drink is even sanctioned by the EPA.
The simple yet potentially essential sequence of filter-bleach-stand-bottle is an absolute keeper for any prepper!

A Simple Water Purification System

There’s one method of making a water still that is so simple and effective it can be done just about anywhere, constructed in minutes, and with no special knowledge or supplies. And it can turn salt water into fresh water as well.
All you need is a little sunlight to get the process going. It’s a technique that was invented by the U.S. department of agriculture to pull water from the arid Arizona deserts, and it’s even more effective in less extreme climates

How It Works

The general principle of this still is the same as the “greenhouse effect” on our planet. Heat from the sun passes through the clear plastic, heating up the soil and causing the moisture content within it to evaporate. This moisture then tries to escape into the air but gets caught on the underside of the plastic barrier and condenses into water droplets. By placing a heavy object like a rock directly over your water containment device, you will be directing the water drops to the lowest point of the plastic, where they will collect and drip into your container. After several hours, you will have perfectly clean, distilled water to drink.
This method is also effective for purifying bad water or even urine. Simply pour the tainted liquid down close to your container (but not in it). Through the process of evaporation and condensation, only pure water will collect in your cup.

Supplies You Need

To build your solar still you need a big sheet of clear plastic, a few rocks or other heavy objects, and a container to catch your water in. A hard sided container works best, but you can use just about anything (even a sandwich baggie) in a pinch.
That’s it! A shovel certainly helps the digging process but it isn’t necessary. You can keep your sheet of plastic in your bug out bag or some other handy place where it will be accessible in an emergency.

Building Your Solar Still

First, find a patch of ground that gets lots of sunlight, especially in the early morning. If you can, choose a spot with lots of vegetation or that is a dried out stream bed. These places are more likely to have water in the soil.
Next, dig a hole that is big enough to fit your water collection container. Try to make your hole as wide as the piece of plastic you have. The more surface area your plastic can cover, the bigger the area that you can pull water from. Wider holes also need to be deeper, so that there is room for the rocks to weigh down the plastic without falling right into the water container. step-1
You can also dig a second hole just for your container to get it down deeper.step-2
After setting the water container in place, cover your hole with the plastic and pile dirt and rocks around the edges to weigh it down. This is crucial because your still won’t work if an edge of the plastic comes lose.step-3
Find a small rock or similarly weighted object and position it directly over your water container. step-4
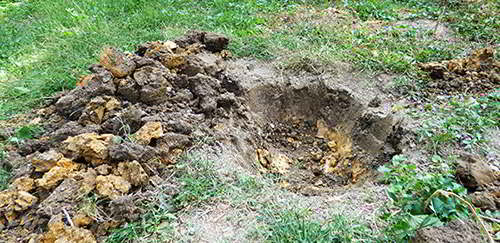
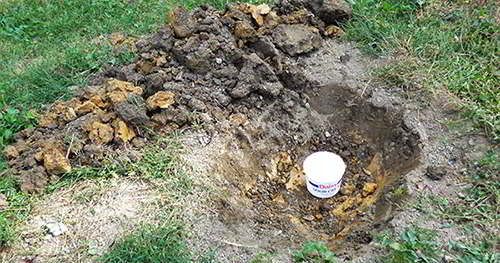
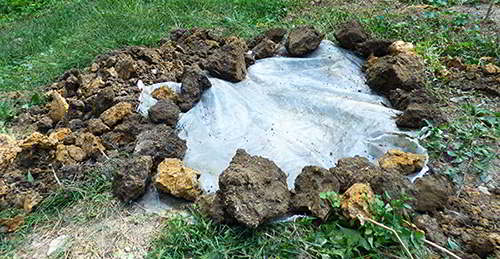
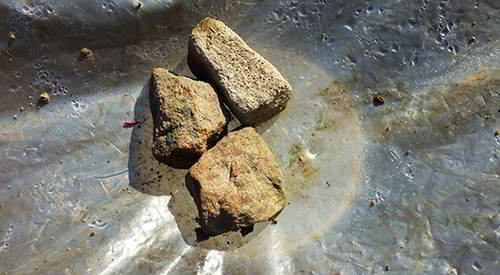
Be sure to check if the weight of the rock is pulling too much on the plastic. If so, add more rocks and dirt to the edges.
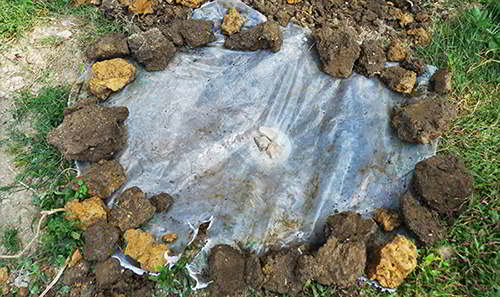
step-5
Finally, wait several hours for condensation to occur. You should start getting water within two hours, though for best results, step up your still in the evening and check it in late morning to take advantage of morning dew. You can carefully pull out your water at any point and reconstruct the still to gather more.step-6
When built correctly, a still like this can provide you with less than a quart of water a day depending on the humidity, sunlight, temperature and altitude. It might not be enough to let you run a marathon, but it will keep you alive in a dire situation. You can build multiple stills to maximize your water gathering potential.

Words of Caution

Be careful to keep your plastic as clean as possible before building your still. Dirty plastic will produce dirty water and might make you sick if you drink it.
Also, remember that this solar still is a lifesaving device, not an alternative for packing your own water. If you are going hiking or camping, be sure to bring all the water that you need with you as well as a regular water purifier in case you run into trouble. A solar still like this should be saved for true emergencies.

Thursday, May 17, 2018

How To Turn Salt Water Into Fresh Water (Simple Improvised Distillation)

For the purpose of this tutorial, the metal trays hold both bottles firmly in place. While you probably won’t have trays ready in a survival situation, you can substitute them with a pile of sand and bury one of the bottles at the very top of the pile with its mouth sticking out. Then, you can build your fire on top of the mound. As for the bottles, sadly, human trash has gone everywhere and plastic bottles usually wash up on beach shores, so they won’t be hard to find.